


1983 Jeep CJ7 Oil Leak Fix
After the Tub Swap and the paint job, the Engine decided it needed to start marking the Jeeps territory by leaving oil everywhere it went. this is of coarse not acceptable when the oil leak is this bad.
| ↓ Click the Image to Enlarge ↓ | ||
|
|
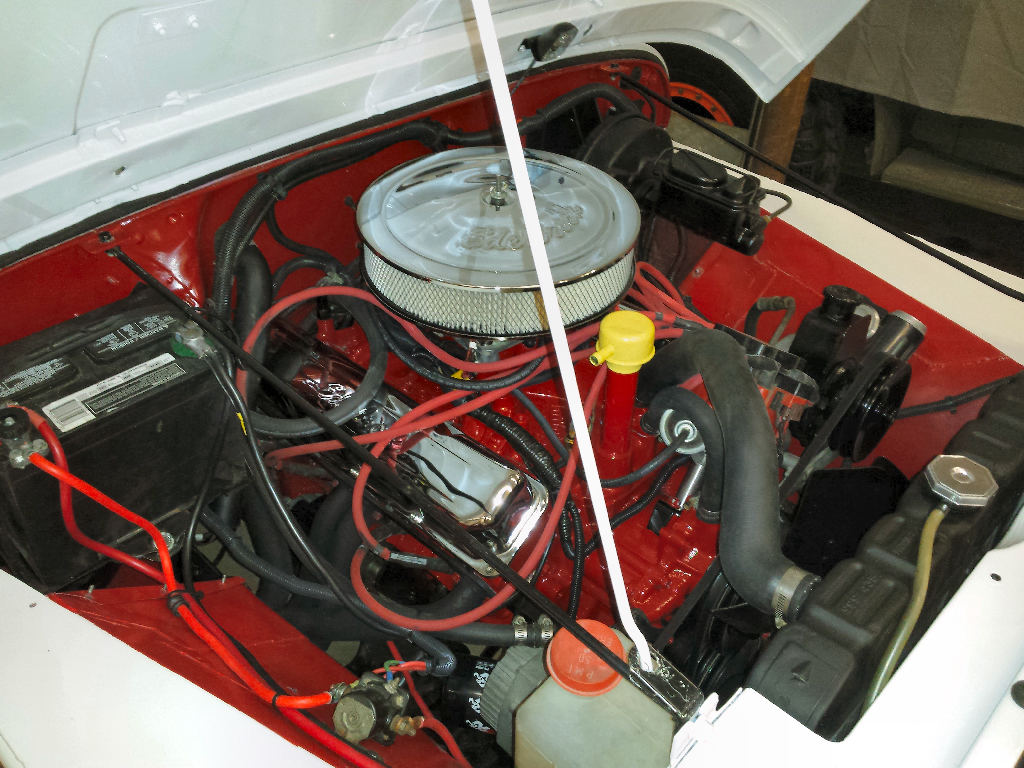
Brought my brothers 1983 Jeep CJ7 back to my shop to fix a nasty oil leak that it had developed. First attempt was to locate the source of the leak, but it seems to be leaking from several places in the same general area. All located in the front lower passenger side of the engine around and to the rear of the oil pump/filter. 2015-01-05 | |
|
|
Walked into the shop and found that the Power Steering Leak had become worse than the oil leak. Oh well it's was on the list anyway, just making a bigger mess in advance. Pulled both front fenders off to gain better access and start the repair process. Cleaned the area up some and started the engine to see if the leak was plainly visible. Looks like both the oil pan gasket and the oil pressure line are the main culprits. 2015-01-06 | |
|
|
Well, the weather broke and we got warm enough for the Hot Water Power Washer to come out and clean the majority of the gunk off. I pulled the Jeep out and up on my ramps and removed the headers and covered the intake. After about an hour of cleaning the engine and Jeep are much less greasy. There is a few spots I'll have to hand clean, but that won't be bad. I have discovered one leaking freeze plug so I'll replace it, it appears to be driven in too deep. 2015-01-17 | |
|
|
Started tearing the front/engine down. I probably should have done this before the power hot water cleaning, but I thought it best to drive it out and back in to the shop, however I didn't drive it back it I pulled/pushed it bask). Drained the fluids and removed items. I will have to start some more cleaning. 2015-01-18 | |
|
|
Started the engine partial teardown in preparation of installing the new gaskets and seals and applying some clean fresh paint. Everything looks good. 2015-05-25 | |
|
|
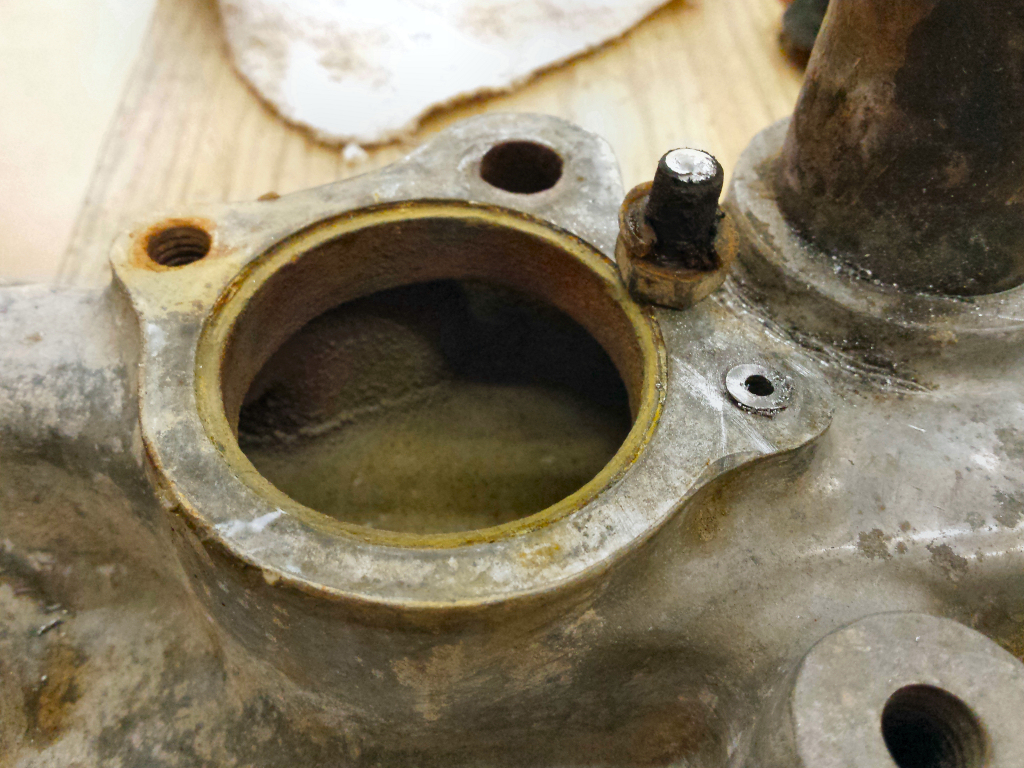
Been slowly soaking and cleaning the engine parts. I've got the oil pan cleaned and rust protected/converted. After de-greasing the intake manifold I removed the thermostat housing only to have one bolt brake off. After drilling and using an extractor I was forced to up size the hole and re-tap it to 3/8, as only part of the original 5/16 bolt would come out with the extractor. Also the other hole didn't have any good threads at the top, I will need to pick up a bottom tap to finish threading the new holes before re-assembly. I also clearance the thermostat housing to accept the larger 3/8 bolts. I cleaned up the intake, but not good enough to leave it in it's natural aluminum finish, So rather than having it polished I'll paint it. I also degreased the timing cover and will install new seals and oil pump gaskets before paining it as well. The fairly new water pump is also cleaned and rust protected and ready for paint. I had finally got the few significent damaged spots repaired on the dash pad, so it got painted today. 2015-02-05 | |
|
|
Started the process of priming and painting the Engine Parts. The intake was primed with a self etching primer as it's aluminum, the rest was epoxy primed. The oil pan surface is rough, so the end paint surface won't be like glass, but should look good with the rest of the engine rough casting surfaces. The paint is Case-IH Red from Case, and I've added a PPG Shop-Line High Gloss Enamel Hardener to give the paint a more robust durability. I painted the intake while off the engine so I could get better coverage and coats as it would be very difficult to paint it while on the engine with the engine in the Jeep. 2015-02-06 | |
|
|
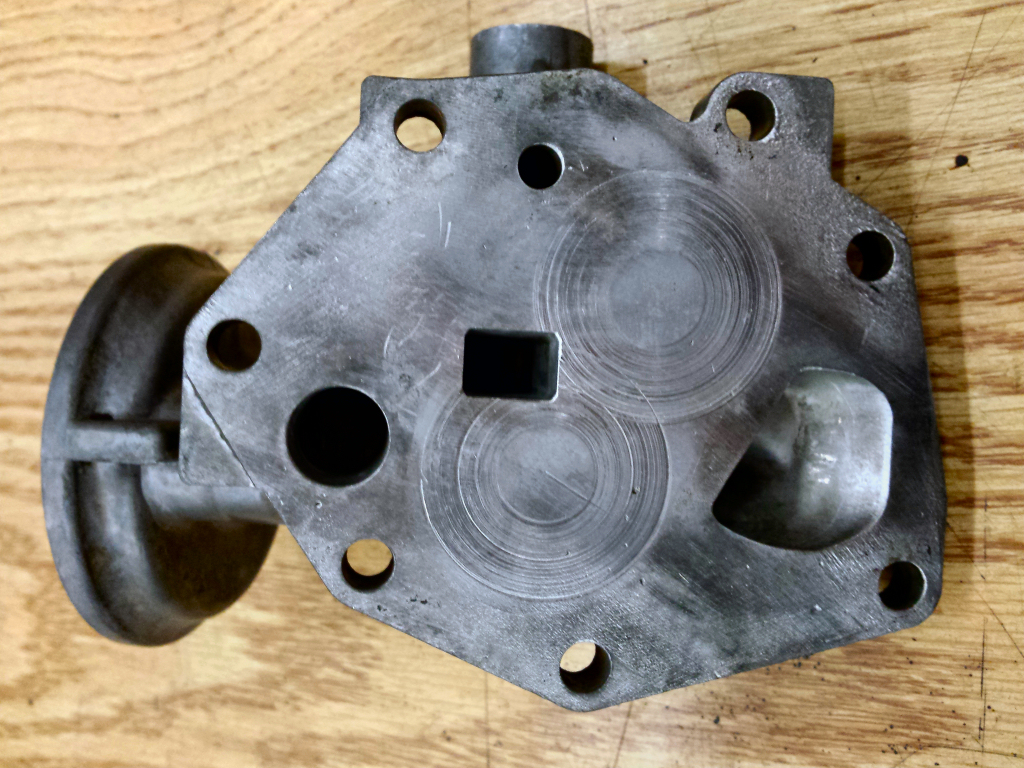
Disassembled, cleaned and re-assembled the oil pump and timing cover. It's not primed and ready for re-assembly to the engine. The inside of the pump housing has some soring, it's likely that the engine at some point in it's life had a failure that resulted in some metal getting draw up into the pump. I polished the mating surfaces some, but based on the uneven wear pattern I wasn't prepared to get it perfectly flat and result in an interference issue. I used assembly lube to coat the parts and lube the pump so that it will easily prime when I pre-lube the engine before restarting it. 2015-02-08 | |
|
|
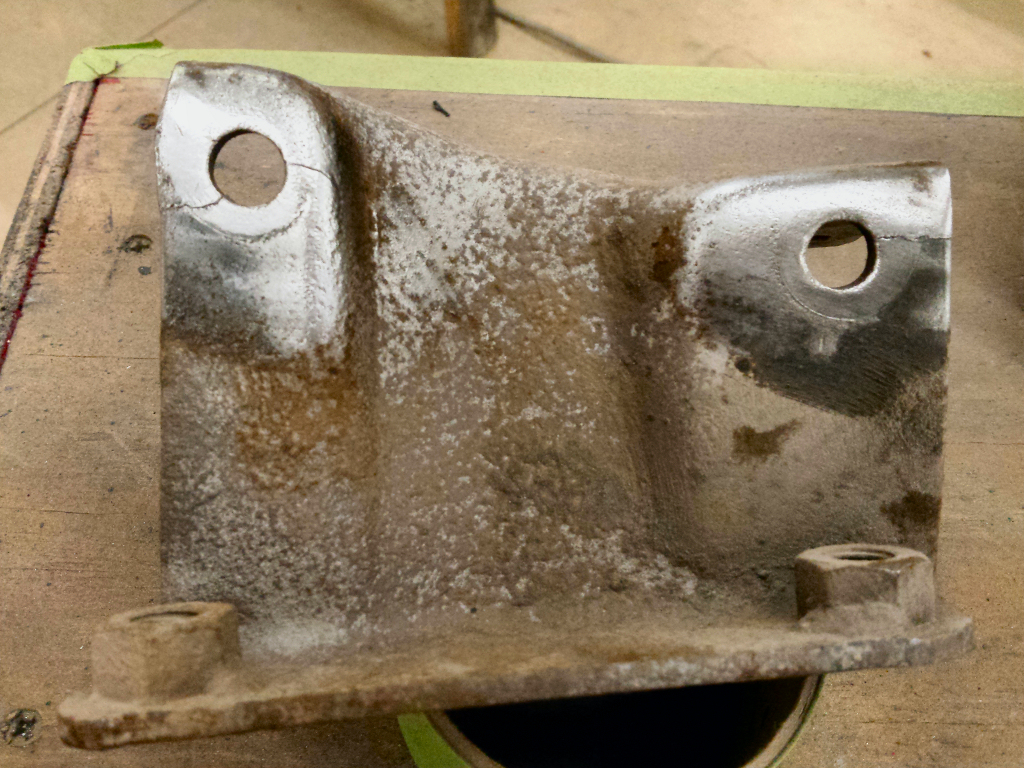
Well, started working on a few small items/parts and decided to also swap in the replacement power steering box and clean and paint the pump. Well it didn't start out good. The person who did the shackle reversal on the Jeep closed off the frame end and the nuts that were no longer captured (welded) to the inside. Also you had to remove the brackets to get the replace the box as you could not access two of the bolts holding the box were inaccessible. So after fitting the loose nut and getting the brackets/box off the frame, I found the front box reinforcement had a broken weld, and that one of the brackets had the holes cracked. I fixed the broken weld, and welded up the cracks in the bolt holes and then welded a washer to the back side for additional reinforcement. To address the loose nuts inside a boxed in frame rail, I decided to drill holes in the upper part of the frame and will run a bolt all the way thru the frame to attach the bracket that holds the steering box. 2015-02-09 | |
|
|
Well, not as much done as I wanted. I went and picked up some needed bolts, but they didn't have the length I wanted for the steering box mount change, and I bought the only option a size shorter in length. Well it's not long enough to properly secure it, so I'll be on the hunt for another source locally for proper length G8 bolts. So I wasn't able to install the new PS box. So I finished cleaning up the bottom of the block and installed the new rear main seal. The bearing had some damage, but not too wore. I cleaned everything up, installed the new seals, and re installed the rear main bearing (assembly lube on the bearing). Then it came time for a little more engine cleaning before I started masking everything off. went to install the intake manifold, and well you have got to love companied why try and supply everything you need except the one item you won't have on hand. The intake pan gasket came with RTV (which I always have plenty on hand) but the instructions also call for a brush able gasket sealer for the intake ports. They don't include that and it's not something I use to have/keep on hand. So while I'm out looking for the proper length bolts, I'll also pick up some brush able gasket sealer and pick up the bottom tap that is due to be in tomorrow. 2015-02-10 | |
|
|
Got the steering box installed. The two new through the frame bolts, are a little short, but they are the longest grade 8/8.8 I could get quickly. Still need to replace the tie rod ends, then it will need a front end alignment. Installed the intake manifold, timing cover, water pump and oil pan. Dang 4 piece oil pan gaskets, hopes it doesn't leak. Next one more round of cleaning and wiping the engine down then apply the paint. 2015-02-11 | |
|
|
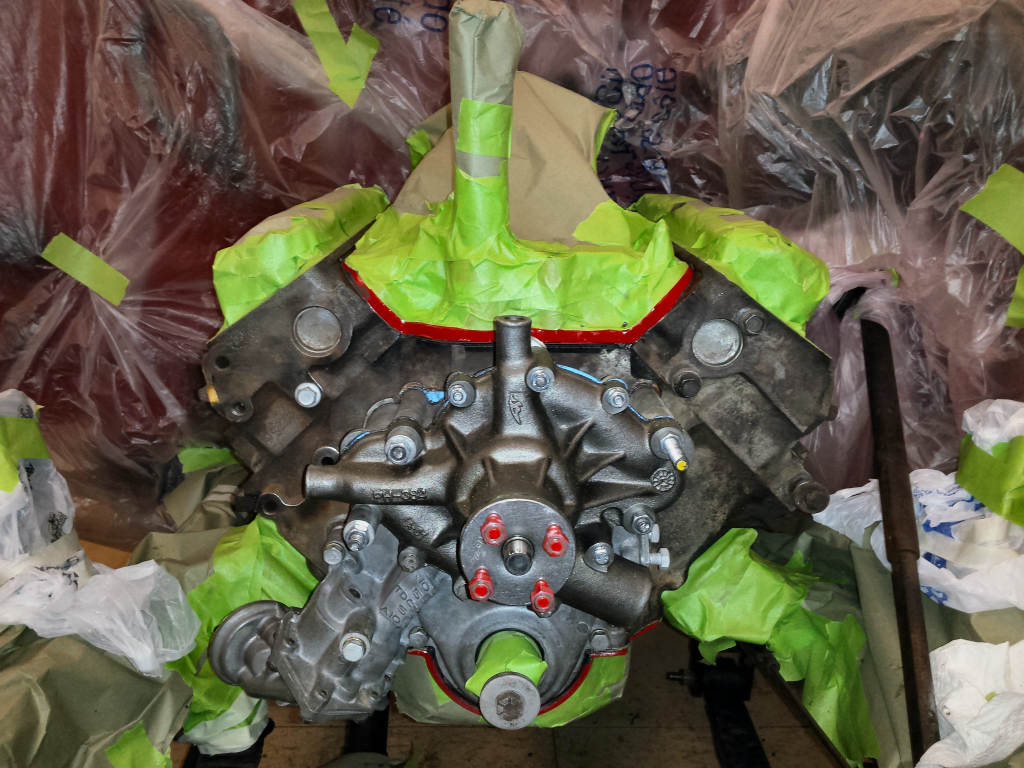
Well, I cleaned the engine one last time before applying the Epoxy Primer. Then Primed and painted the engine. Next came the de-masking it before masking off the underside of the hood. Then I lightly sanded and cleaned the hood before applying some spot primmer. Originally I was to paint the missed edges of the hood white then paint the center red to match the engine/firewall. After looking at the condition of the hood, if I went ahead and painted it red, the surface dents and imperfections would stand out a lot, so with Darrell's OK, I painted the entire underside of the Hood white. After demasking the hood and looking everything over, all looks good. The Hood in white was a good choice, as the Case/IH brand of Red paint is a brighter nicer color than the off-brand spray can color I had painted the firewall in back in 2011. 2015-02-12 | |
|
|
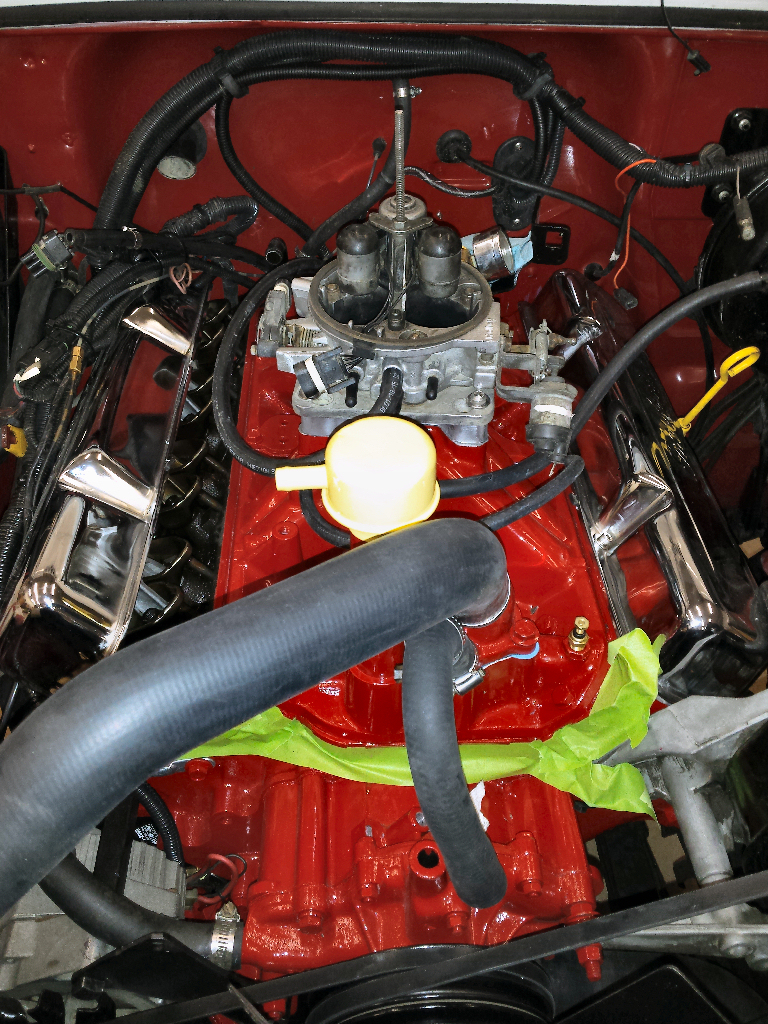
Made a couple of new throttle plate gaskets and installed the Throttle body. I also installed the new Temp Sensors as well as filled the crankcase with oil and installed a new filter and connected the oil pressure line. Next came the cleaning, blasting and painting of the pulleys and alternator bracket. 2015-02-13 | |
|
|
More cleaning, painting and assembly. Looks like I'll need to do a little wire re-routing and cleanup to make it look even better than it did before. 2015-02-14 | |
|
|
Well, the front of the grill had a couple of rust spots, and a few chips on the edge, so I cleaned, sanded, sprayed some fill primer, sanded and painted the front while I was also painting the exposed back portion. 2015-02-15 | |
|
|
Walked into the shop today to be greeted by a new oil leak. Yes, two fixed and a 3rd one now needing to be foxed. Looks like the Dana 30 Pinion Seal decided it want's me attention. I cleaned up some of the wiring and re-routed several to make the installation look better. I also installed the new valve covers and air cleaner. Next came the replacement tie rod ends. Lastly today was the re-installation of the grill and connection of all but the upper and bypass water lines. 2015-02-16 | |
|
|
Installed new Vacuum lines and new vacuum plug caps. Installed a new front Dana 30 pinion seal, but it did not fix the oil leak. looks like it will need a new yoke, or a ready-sleeve. Also primed the oil system, hit 55 PSI with the drill. Then installed the distributor and timed it based on where I remembered it setting when I pulled the distributor. After connecting the last of the battery cables, and the fire wall bulk head connections, I gave the Jeep a quick start test. Once the fuel system was primed it started up. Only let it run for a few seconds as it doesn't have coolant. A good hour later I started it again and let it run for only a few seconds again (long enough to see good oil pressure) I shut it down again.. Timing is close, starts a little hard, and I see no leaks so all seems good. Installed the right fender, and once I have the needed tap to finish the thermostat installation I can install the left fender. 2015-02-17 | |
|
|
Nothing big today. Greeted by the bigger oil leak from a clean bad Front Axle Yoke with the new seal. New Yoke on order. Installed the shifter boots and painted the Jeep logo on the dash pad. Also did a few little things in the engine compartment and did some paint touchups. I also picked up and put of some of the shop tools and parts that had accumulated while working on the Jeep. 2015-02-18 | |
|
|
Well, got the new bottom tap to finish the new thermostat housing bolt holes. With the holes tapped to the bottom and a little shortening of the bolts I was able to install and get to seal the thermostat. Attached the hoses and filled it with anti-freeze. Why is it I always have a water leak when I re-fill an engine/radiator? Apparently the lower radiator hose at the pump needed a very tight clamp. Also install the left front fender and got it all re-aligned. It was time for a test drive. Started good, and oil pressure was good (50 psi) and water temperature came up to the high side of normal. Checked the temp with an inferred thermometer, and the water neck, and oil pans were in the high 180's to low 190's, all good. Ran down the road to get some fuel and back and the timing was off (still too advanced). Checked with the timing light and it was at 45º total timing. Called a buddy to verify the proper setting and dropped it back to 12º initial and 28º total timing. running better, but also had to drop the idle screw a lot. No assuming there isn't a big puddle under it tomorrow and the replacement Dana 30 yoke arrives and fix's the differential oil leak it should be all good. 2015-02-19 | |
|
|
Greeted by a new leak. Coming off the leading edge of the bell housing. HAs no order, so it doesn't appear to be motor oil, suspect it's transmission lube. I'll check the trans and see it it's fluid smells and is low. A small seep at the replaced freeze plug. I installed it with mega black, but it slid in further than I'd liked once I tapped it in. Oil pump/filter, fuel pump block off plate and pressure sending fittings all appear to be good as does the oil pan. 2015-02-20 am | |
|
|
The yew Dana 30 Yoke arrived in the afternoon mail. So a quick coat of paint and I pulled the old one and installed the new one. The leak between the yoke and the seal stopped but still have some small leakage between the seal and the housing. I went ton check the transmission oil and when I pulled the fill plug was greeted by white kind of foamy oil. So I pulled the drain plug and drained it all out, then a little quick flush with some brake cleaner, and I filled it back up with some good John Deere GL5 (80-90w). 2015-02-20 pm | |
|
|
Well Crap! Did another visual check on the Engine and found the intake leaking oil! that's what I get for following the instructions that came with the intake gasket set. The oil is leaking between the intake and block along the seam between the rubber gasket and the intake. The instructions did not call for any gasket sealer to be used along it, but only on the ends. Should have followed my normal routine of slathering that stuff on everything. Also found oil at one of the intake bolts, not sure where it came from other than from the bolt. 2015-02-21 | |
|
|
Well, if it doesn't leak this time I'll be shocked and amazed. This is not near as a clean of a re-install as my initial installation. I should have known the job would go to hell when it all came apart fairly easily and clean. The re-install started out good, I coated both sides of the valley rubber gasket with Ultra-Black, and finally got the bolts started. Then while cinching them up, no where near tightening, the damn rubber gasket squished out between the intake and block, and I could not get it to stay back in while poking it back. So I resorted to cutting and pulling it out. Then filled the gap with the Ultra-Black and waited an hour before going any further in the tightening process. What a crappy mess and design. It's back on and tightened up, now to wait for it to cure and then do some more paint touch-up and put everything else back on and see how bad it leaks. 2015-02-22 | |
|
|
Well, painted the seal area as best as I could as well as the fasteners. Re-assembled everything and filled it back with anti-freeze. It took many attempts to get the distributor properly timed this time. I tried to install it off one tooth to see if I could get the timing down to 10º base, but it just wasn't going to happen and keep everything adjsutable and out of the PS belt. The timing is again set at 12º/28º and the engine starts good and runs good. So for no leaks, but it was the next day last time before they reared their ugly head, so we will see what tomorrow brings. 2015-02-23 | |
|
|
Well, I didn't find any leaks under the front of the Jeep this morning. No puddle on the engine either. Took it for a longer driver and all looks good. A little seepage on the drivers 6valve cover gasket, and might be a little seepage on the intake to block at the back but everything else looks good. A small amount of oil on the bottom of the oil filter, but can't see where it's coming from, yet. The radiator cap leaks some coolant, but it looks like it did that before as well. Oil pressure looks good at road speed and while idling hot. Loading the Jeep up to take it back to it's owner, my brother. 2015-02-24 | |
|
|
Delivered the CJ7 back to my brother, He was very happy and helped me install the Dash Pad. Test drives were going great until the rear brakes started squeaking while braking. So no he wasn't as happy. It sounded like a broke spring, and since neither of us had been into the rear drum, he ordered new pads and a spring kit. Sure enough a broken spring, but it now has great rear brakes. He was also able to order and get the polished steel breather cap locally that I couldn't get locally here. Now the engine has a little more bling. 02/27/2015 | |
Some Before and After comparisons:
Return to Darrell's 1983 CJ7 Page

